keep practicing and practicing
python 用作计算器
_指代上一次计算结果""或''操作字符串, 表示引号本身使用 \ 转义, 不希望转义, 在字符串前加r- 多行字符串字面量使用三重引号,
\可将两行连接 - 字符串使用
+拼接,*重复, 相邻的两个或多个 字符串字面值 (引号标注的字符)会自动合并 - 使用[a:b] 索引字符串, 左闭右开, python字符串不可改, 要生成不同字符串应新建
- 列表和字符串一样支持索引和切片, 还支持合并+, 可更改
1 | # fibonacci series |
查询关键字/保留字
1 | import keyword |
1 | # TempConvert |
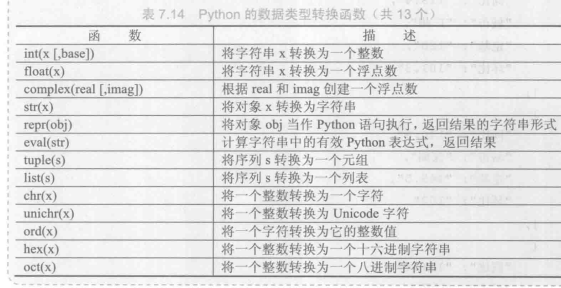
eval()
eval函数将字符串转换为数值
m = eval(input("string"))
如果无eval函数, m 将被解释成字符串, 因为input获取用户输入的结果是字符串.
import
import libNamefrom libName import <funcName1, ...>* 通配符表示所有函数, 这种调用时不用指定库名
turtle绘制
1 | import turtle |
绘制螺旋线
1 | import turtle |
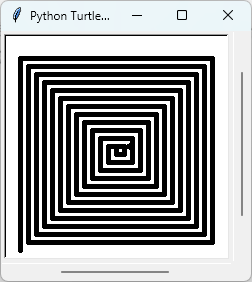
更简单的方法
1 | import turtle |
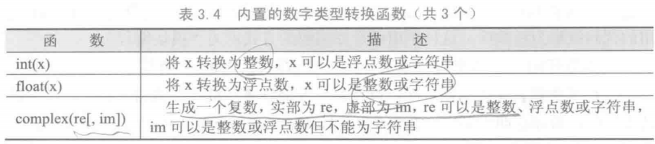
数字类型
整型
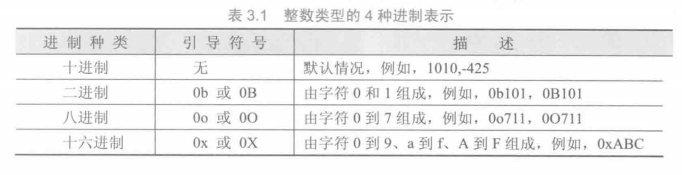
Python语言能够支持无限制且准确的整数计算,因此,如果希望获得精度更高的计算结果,往往采用整数而不直接采用浮点数。
浮点型
1 | import sys |
1 | import decimal |
复数
1 | complex = 6e-19 + 8j |
复数类型中实数部分和虚数部分的数值都是浮点类型。
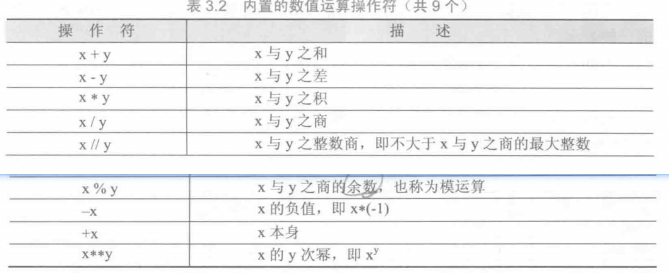
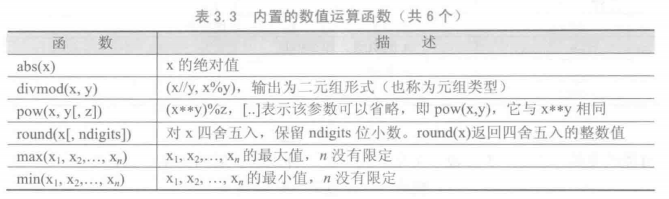
数字类型的操作
9个基本数值运算操作符:
1 | print(abs(3-4j)) # 5.0 |
1 | print(complex(4.3,1.2)) # (4.3+1.2j) |
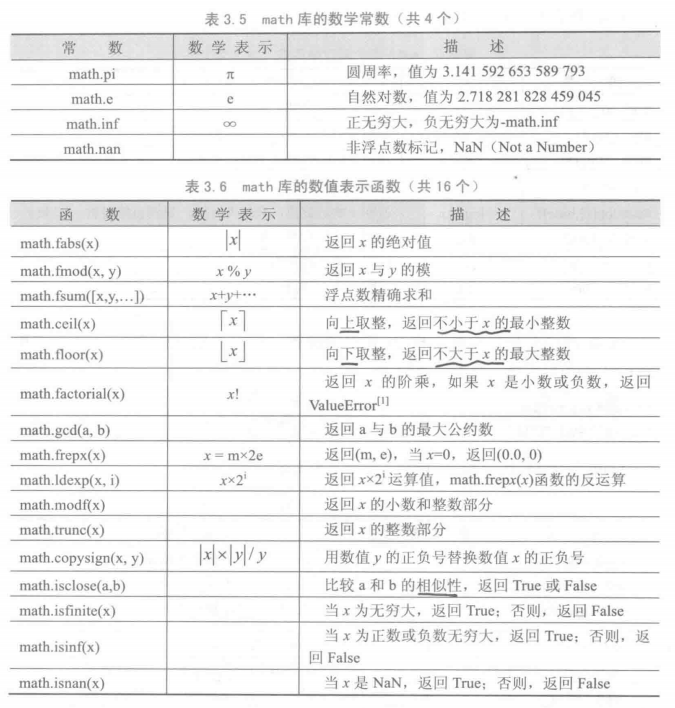
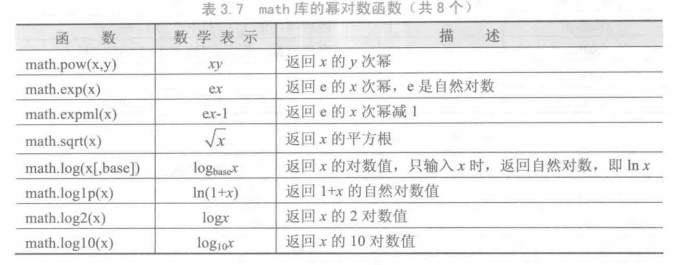
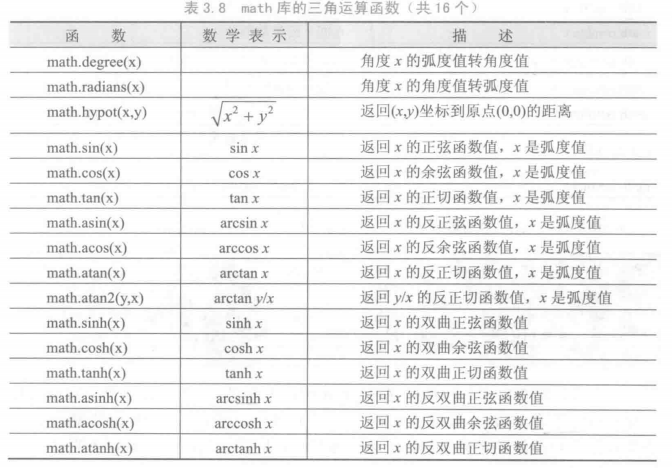
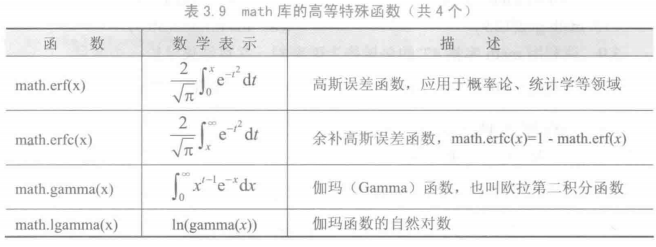
math 库
字符串
1 | print('''云想"衣裳"花想'容', |
pyhton不区分字符和字符串, 都是字符串类型
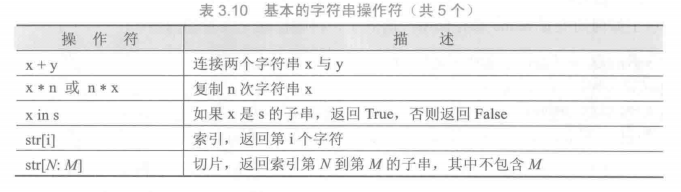
基本字符串操作符
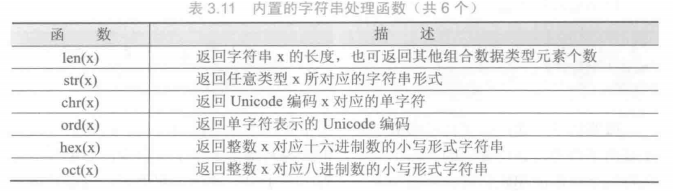
内置字符串处理函数
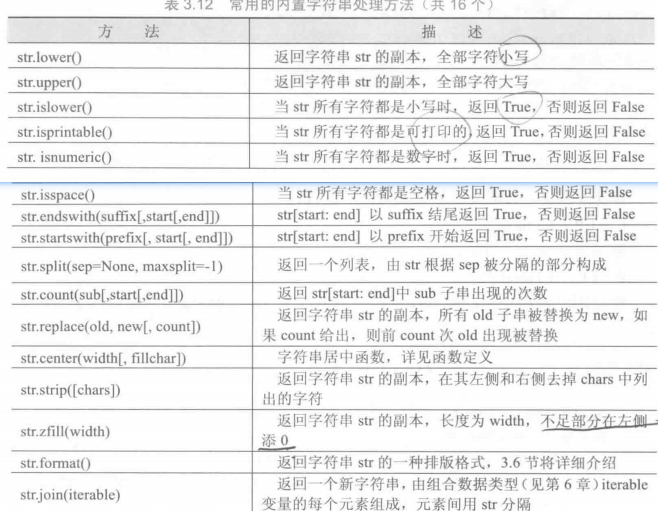
内置字符串处理方法
字符串的格式化
format()
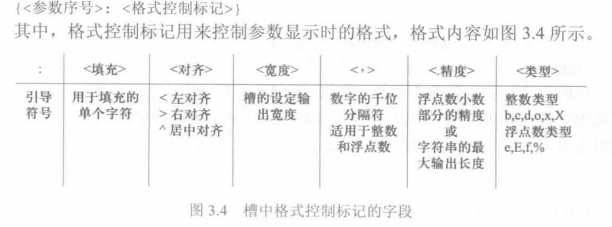
1 | print("{0}{0}{0}{1}{2}".format('w','.slacr','.site')) |
文字进度条显示
1 | # prac textProgressBar |
程序的控制结构
1 | for ch in "人生得意须尽欢": |
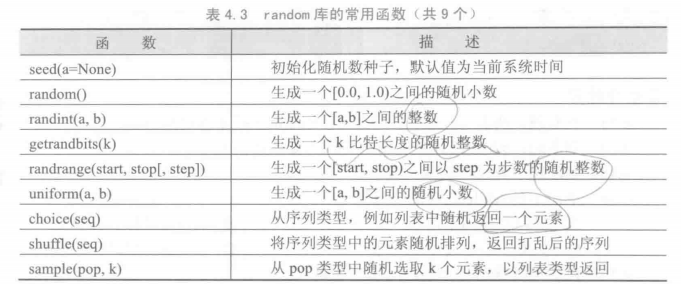
random 库
1 | # -*- coding: utf-8 -*- |
蒙特卡洛方法计算圆周率
1 | # -*- coding: utf-8 -*- |
异常处理
1 | # try- except |
1 |
|
函数和代码复用
lambda 函数
1 | # -*- coding: utf-8 -*- |
可选参数 和 可变参数
1 | # -*- coding: utf-8 -*- |
参数的位置和名称传递
Python提供了按照形参名称输入实参的方式, (发现一些内置函数并不支持)
这样传递的参数叫关键字参数(keyword arguments)
有些内置函数是不采纳关键字参数的, 比如, print(math.log(4, base=2)),
会报错TypeError: log() takes no keyword arguments, 自定义函数都是支持的.
1 | import math |
全局变量 局部变量
1 | # -*- coding: utf-8 -*- |
(1)简单数据类型变量无论是否与全局变量重名,仅在函数内部创建和使用,
函数退出后变量被释放,如有全局同名变量,其值不变。
(2)简单数据类型变量在用global保留字声明后,作为全局变量使用,函数退
出后该变量保留且值被函数改变。
(3)对于组合数据类型的全局变量,如果在函数内部没有被真实创建的同名变
量,则函数内部可以直接使用并修改全局变量的值。
(4)如果函数内部真实创建了组合数据类型变量,无论是否有同名全局变量,
函数仅对局部变量进行操作,函数退出后局部变量被释放,全局变量值不变。
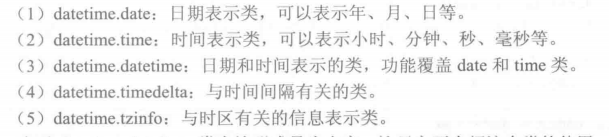
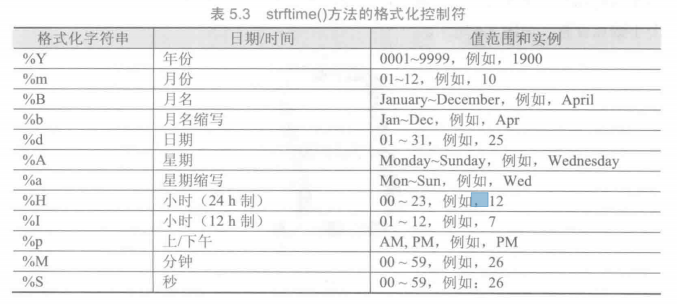
datetime 库

1 | # -*- coding: utf-8 -*- |
七位数码管动态显示时间
1 | # -*- coding: utf-8 -*- |
函数的递归
1 | # -*- coding: utf-8 -*- |
1 | def nest_GCD(a, b): |
科赫曲线绘制
1 | # -*- coding: utf-8 -*- |
汉诺塔
1 | # -*- coding: utf-8 -*- |
组合数据类型
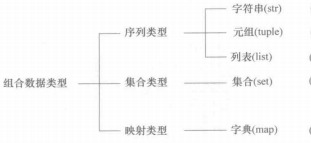
tuple
1 | # -*- coding: utf-8 -*- |
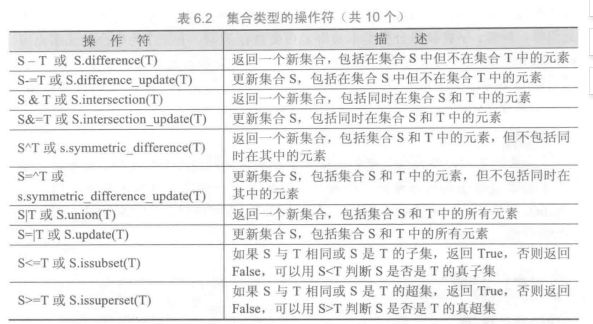
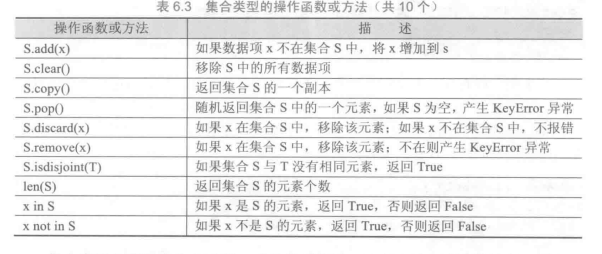
set
集合中的元素不可重复,元素类型只能是固定数据类型,例如整数、浮点数、字符串、元组等,列表、字典和集合类型本身都是可变数据类型,不能作为集合的元素出现。Python编译器中界定固定数据类型与否主要考察类型是否能够进行哈希运算。能够进行哈希运算的类型都可以作为集合元素。

1 | # -*- coding: utf-8 -*- |
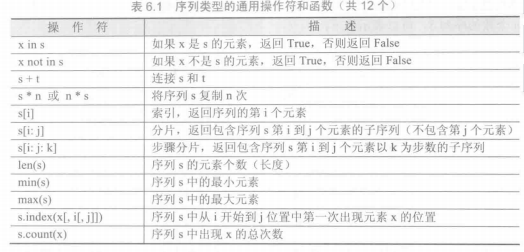
列表类型和操作
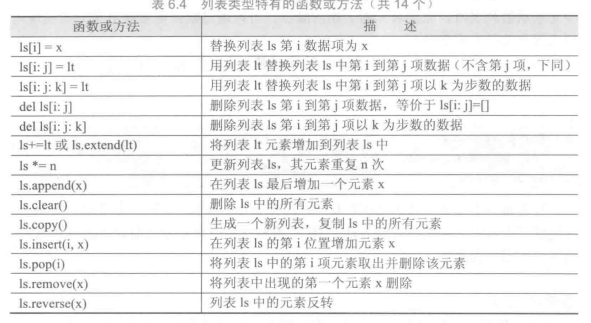
1 | # -*- coding: utf-8 -*- |
基本统计值计算
1 | # -*- coding: utf-8 -*- |
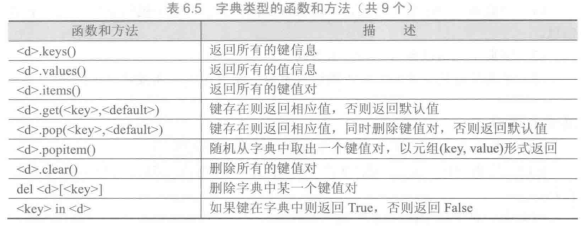
字典类型和操作
Python语言中,字符串、列表、元组等都采用数字索引,字典采用字符索引。
1 | # -*- coding: utf-8 -*- |
jieba 库
一个重要的第三方中文分词函数库
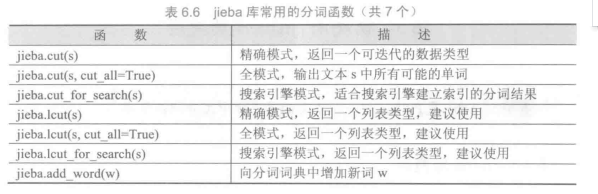
1 | # -*- coding: utf-8 -*- |
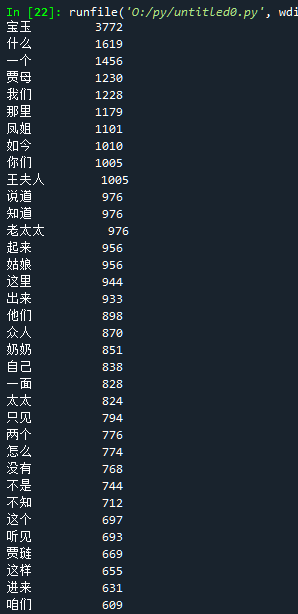
文本词频统计
1 | # -*- coding: utf-8 -*- |
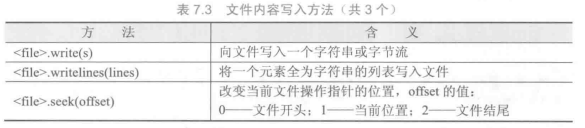
文件和数据格式化
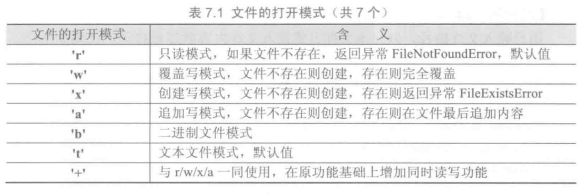
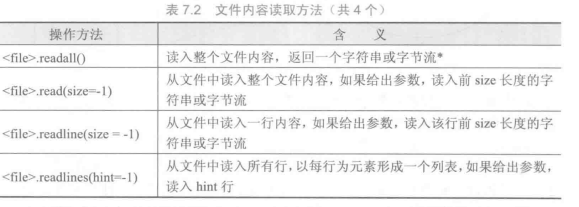
1 | # 文件操作 |
1 | # -*- coding: utf-8 -*- |
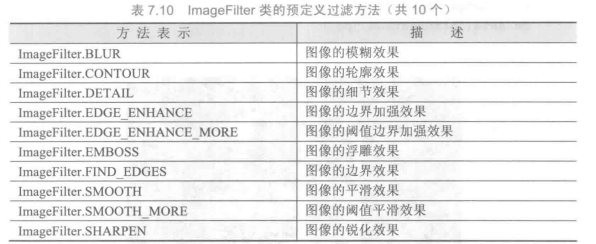
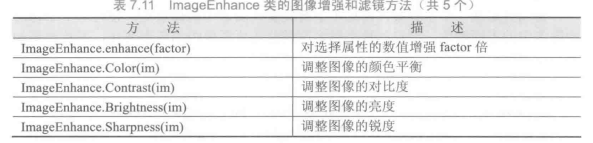
PIL(Python Image Library) 库
PIL库是一个具有强大图像处理能力的第三方库,不仅包含了丰富的像素、色彩操作功能,还可以用于图像归档和批量处理。

1 | # -*- coding: utf-8 -*- |

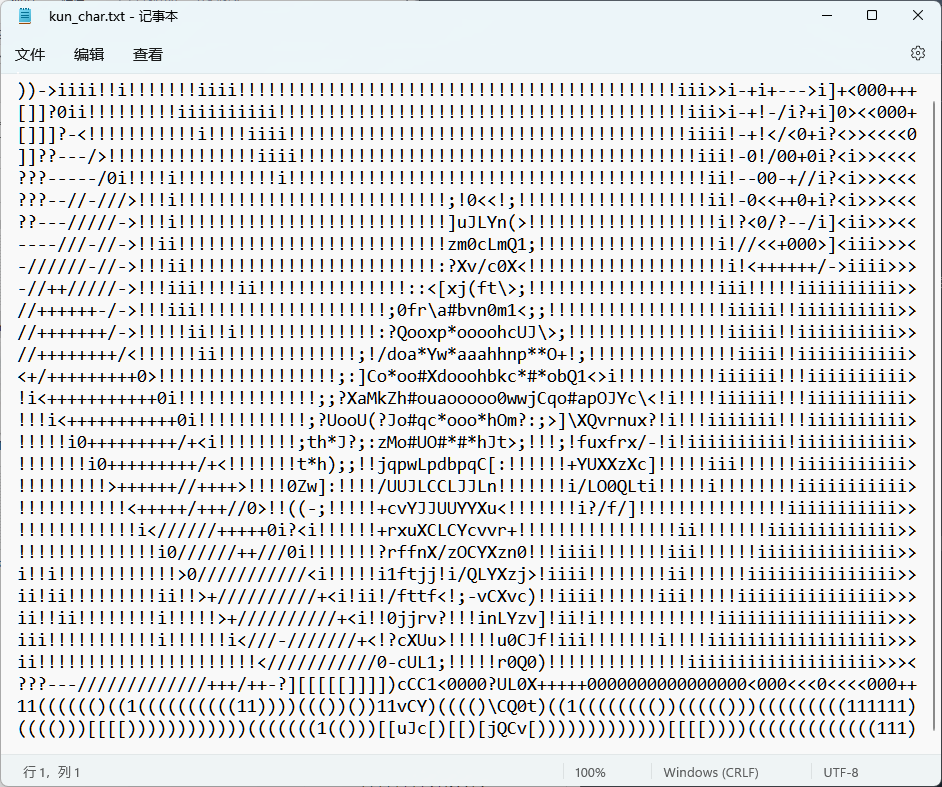
图像的字符画绘制
1 | # -*- coding: utf-8 -*- |
csv
逗号分隔数值的存储格式叫做CSV格式(Comma-Separated Values,逗号分隔值),它是一种通用的、相对简单的文件格式,在商业和科学上广泛应用,尤其应用在程序之间转移表格数据。该格式的应用有如下一些基本规则。
(1)纯文本格式,通过单一编码表示字符。
(2)以行为单位,开头不留空行,行之间没有空行。
(3)每行表示一个一维数据,多行表示二维数据。
(4)以逗号(英文,半角)分隔每列数据,列数据为空也要保留逗号。
(5)对于表格数据,可以包含或不包含列名,包含时列名放置在文件第一行。
Python提供了一个读写csv的标准库,可以通过import csv使用。
1 | # -*- coding: utf-8 -*- |
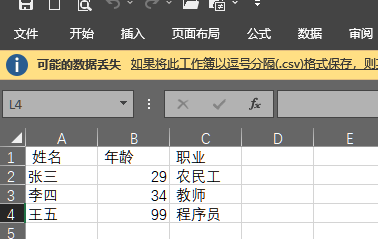
csv 数据在python中可以使用二维列表表示
1 | # csv 转 二维列表 |
csv 转 html
1 | # -*- coding: utf-8 -*- |
json 库
JSON(JavaScript Object Notation)是一种轻量级的数据交换格式
当多个键值对放在一起时,JSON有如下一些约定。
(1)数据保存在键值对中。
(2)键值对之间由逗号分隔。
(3)大括号用于保存键值对数据组成的对象。
(4)方括号用于保存键值对数据组成的数组。
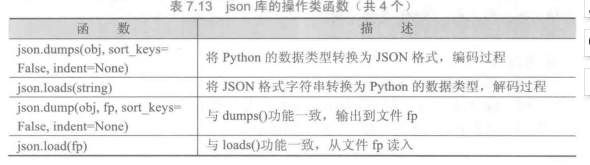
json库是处理JSON格式的Python标准库
json库主要包括两类函数:操作类函数和解析类函数。操作类函数主要完成外部JSON格式和程序内部数据类型之间的转换功能;解析类函数主要用于解析键值对内容。
一般来说,JSON格式的对象将被json库解析为字典,JSON格式的数组将被解析为列表。
1 | # -*- coding: utf-8 -*- |
csv 转 json
1 | # -*- coding: utf-8 -*- |
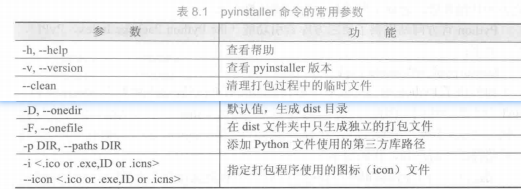
pyinstaller
pyinstaller是一个十分有用的第三方库,它能够在Windows、Linux、Mac OS X等操作系统下将Python源文件打包,通过对源文件打包,Python程序可以在没有安装Python的环境中运行,也可以作为一个独立文件方便传递和管理。
计算生态和模块编程
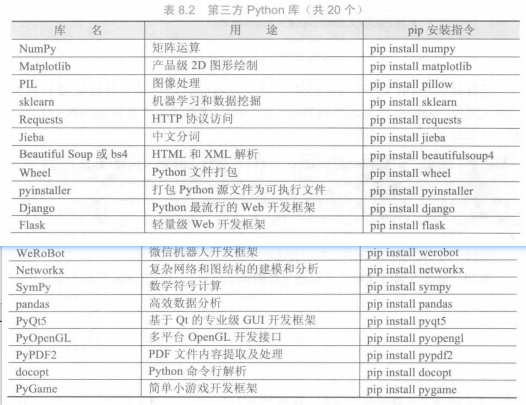
Python官方网站提供了第三方库索引功能(the Python Package Index,PyPI)
https://pypi.python.org/pypi
在计算生态思想指导下,编写程序的起点不再是探究每个具体算法的逻辑功能和设计,而是尽可能利用第三方库进行代码复用,探究运用库的系统方法。这种像搭积木一样的编程方式,称为“模块编程”。每个模块可能是标准库、第三方库、用户编写的其他程序或对程序运行有帮助的资源等。模块编程与模块化设计不同,模块化设计主张采用自顶向下设计思想,主要开展耦合度低的单一程序设计与开发,而模块编程主张利用开源代码和第三方库作为程序的部分或全部模块,像搭积木一样编写程序。
批量安装
1 | # -*- coding: utf-8 -*- |
科学计算和可视化
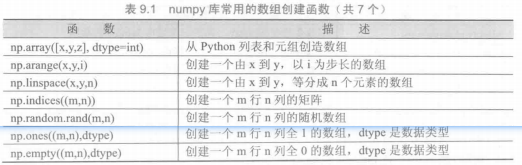
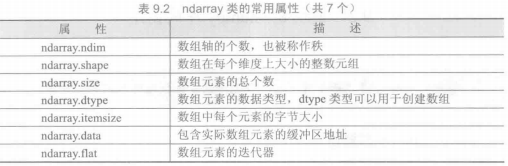
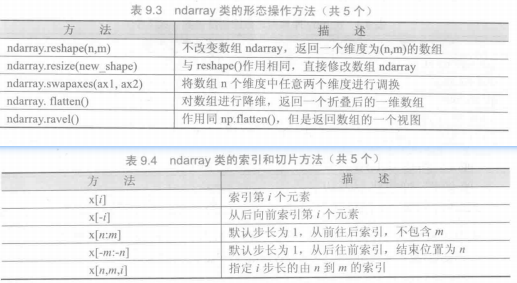
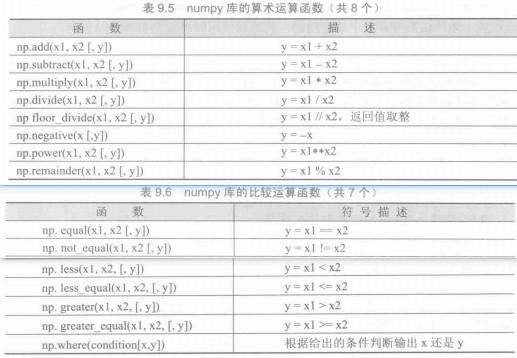
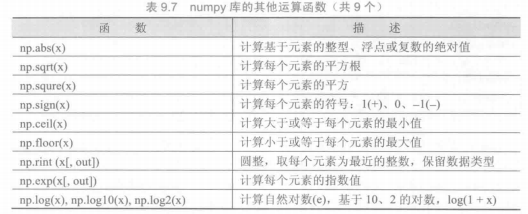
numpy 库
Python标准库中提供了一个array类型,用于保存数组类型数据,然而这个类型不支持多维数据,处理函数也不够丰富,不适合数值运算。因此,Python语言的第三方库numpy得到了迅速发展,至今,numpy已经成为了科学计算事实上的标准库。
numpy库处理的最基础数据类型是由同种元素构成的多维数组(ndarray),简称“数组”。数组中所有元素的类型必须相同,数组中元素可以用整数索引,序号从0开始。ndarray类型的维度(dimensions)叫做轴(axes),轴的个数叫做秩(rank)。
1 | # -*- coding: utf-8 -*- |
1 | # -*- coding: utf-8 -*- |
图像的手绘效果
1 | from PIL import Image |

1 |
|

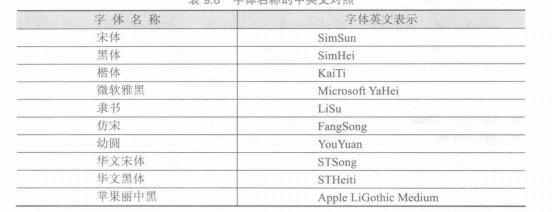
matplotlib
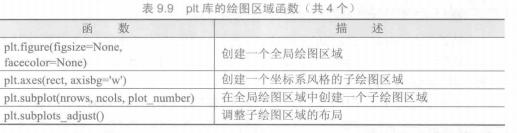
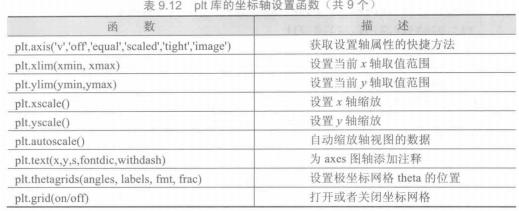
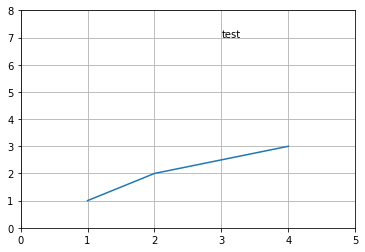
matplotlib.pyplot库
matplotlib.pyplot是matplotlib的子库.plt子库提供了一批操作和绘图函数,每个函数代表对图像进行的一个操作,比如创建绘图区域、添加标注或者修改坐标轴等


1 | import matplotlib.pyplot as plt |

1 | # -*- coding: utf-8 -*- |
1 | # -*- coding: utf-8 -*- |
1 | # -*- coding: utf-8 -*- |


1 | # -*- coding: utf-8 -*- |
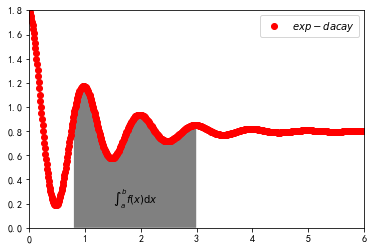
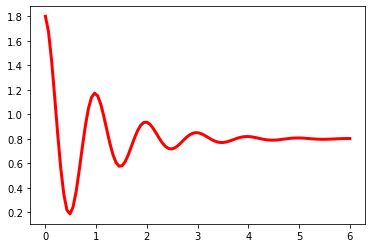
阻尼衰减曲线坐标图绘制
1 | # -*- coding: utf-8 -*- |

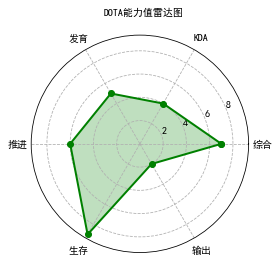
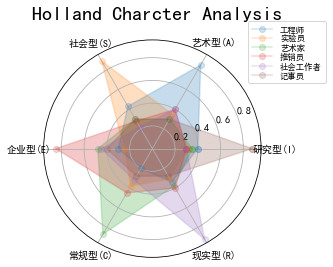
多级雷达图绘制
1 | # -*- coding: utf-8 -*- |
HollandRadar 绘制
1 | # -*- coding: utf-8 -*- |
网络爬虫和自动化
Robots排除协议
Robots排除协议(Robots Exclusion Protocol),也被称为爬虫协议,它是网站管理者表达是否希望爬虫自动获取网络信息意愿的方法。管理者可以在网站根目录放置一个robots.txt文件,并在文件中列出哪些链接不允许爬虫爬取。一般搜索引擎的爬虫会首先捕获这个文件,并根据文件要求爬取网站内容。Robots排除协
议重点约定不希望爬虫获取的内容,如果没有该文件则表示网站内容可以被爬虫获得,然而,Robots协议不是命令和强制手段,只是国际互联网的一种通用道德规范。绝大部分成熟的搜索引擎爬虫都会遵循这个协议,建议个人也能按照互联网规范要求合理使用爬虫技术。
request 库
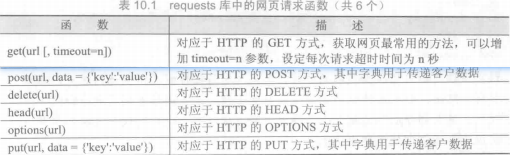
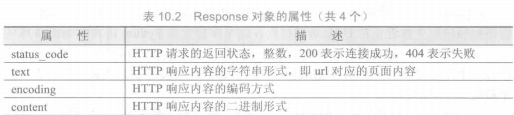
requests库是一个简洁且简单的处理HTTP请求的第三方库,它的最大优点是程序编写过程更接近正常URL访问过程。这个库建立在Python语言的urllib3库的基础上,类似这种在其他函数库之上再封装功能、提供更友好函数的方式在Python语言中十分常见。在Python生态圈里,任何人都有通过技术创新或体验创新发表意见和展示才华的机会。requests库支持非常丰富的链接访问功能,包括国际域名和URL获取、HTTP长连接和连接缓存、HTTP会话和Cookie保持、浏览器使用风格的SSL验证、基本的摘要认证、有效的键值对Cookie记录、自动解压缩、自动内容解码、文件分块上传、HTTP(S)代理功能、连接超时处理、流数据下载等。有关requests库的更多介绍请访问http://docs.python-requests.org

1 | # -*- coding: utf-8 -*- |
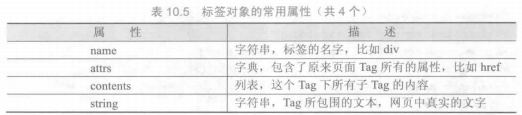
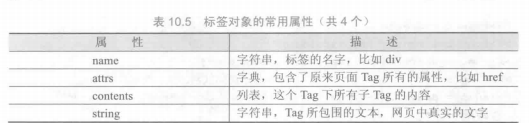
beautifulsoup4 库
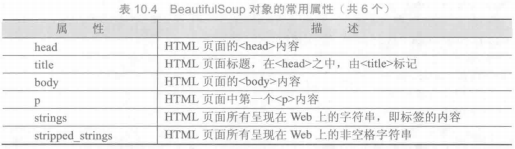
使用requests库获取HTML页面并将其转换成字符串后,需要进一步解析HTML页面格式,提取有用信息,这需要处理HTML和XML的函数库。beautifulsoup4库,也称为Beautiful Soup库或bs4库,用于解析和处理HTML和XML。
1 | # -*- coding: utf-8 -*- |
中国大学排名爬虫
1 | # -*- coding: utf-8 -*- |
其他
参看模块文档
Shell 输入
1 | python -m pydoc -p xxx |
生成临时网页
whl
whl是Python库的一种打包格式,用于通过pip进行安装,相当于Python库的安装包文件。whl文件本质上是一个压缩格式文件,可以通过改扩展名为zip查看其中内容。whl格式用于替代Python早期的eggs格式,是Python打包格式的事实标准
python第三方库的安装
- 使用pip
1 | pip install -U pip # 更新pip版本 |
- 文件安装
1 | pip install <File.whl> |
一行打印爱心字符
偶然看到这个东西, 通过列表的推导式一行生成二维字符画, 其实转化成正常的语句很容易看懂
主要难点在于图形的函数表达式
1 | # print('\n'.join([''.join([('lovelovelove'[(x-y)%12]if((x*0.05)**2+(y*0.1)**2-1)**3-(x*0.05)**2*(y*0.1)**3<=0 else' ')for x in range(-30,30)])for y in range(15,-15,-1)])) |
参考
- python官方教程
- [python语言程序设计基础(第二版)]
- www3schools
- python中的彩蛋
